So here is the scenario: You have a successful roofing business and it seems as though technology is changing daily or you are starting a new roofing business and you are looking to find more customers?
Can I ask one more thing? It seems as though everyone is starting a blog, and you’re thinking that the combination of your passion for roofing and love for customer service must be shared with others?
Then today is your day to start a roofing blog!
All you need are these three steps and 15-20 minutes and you’ll be up and running your own roofing business blog in no time.
Let’s get it done!
The Three Steps to a Roofing Blog:
- Domain Name and Hosting
- Installing WordPress
- Making Your Blog Look Sharp!
1) Domain Name and Hosting
This is the exciting part!
What do you want your domain name to be?
Ours of course is roofingbydesign.net. If .com is available, take it. We are in the process of purchasing .com when at the time it was not available. Make sure to brainstorm every possibility. Maybe you already have a website, than look at abcroofingblog.com. If you are a new roofing company, than the door is wide open for names. Once you have thought of some possibilities head to Bluehost to see if your domain name is available by going to Get Started Now!.

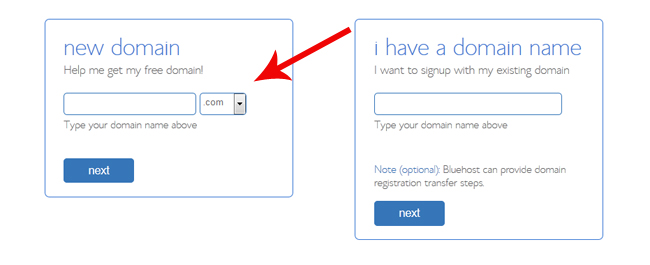
Type in the domain name in the box that looks like this:

You’ll also need to host your domain name. Hosting is like renting space on the web to display your blog. Bluehost has great rates and gives you your domain name for free if you decide to host with them.
Such a great deal!
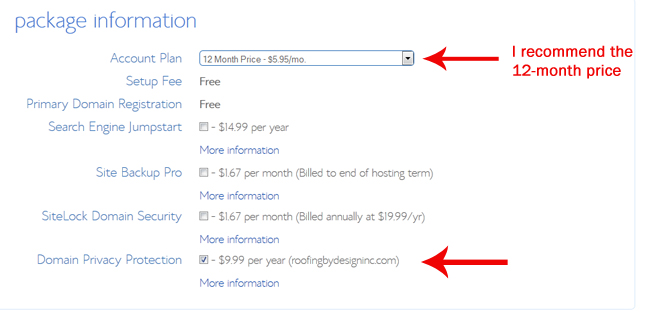
Below is a screenshot of what I use for our package information settings on RoofingbyDesign.net.
The Domain Whois Privacy shields your personal address and phone number from being displayed to the public.

2) Installing WordPress
Once you’ve completed registration with Bluehost you’ll now need to go through the process of installing WordPress.
Don’t worry anyone can do it!
WordPress is a blogging software. It’s the software that we use for RoofingbyDesign.net. The best part is that it’s SUPER easy to use and it’s also super easy to install on your website. JACKPOT!
Here’s how: Login to Bluehost and scroll down to the Software/Services section of the first page. Click on WordPress logo.

On the next page click the option to “Install a brand new version”.

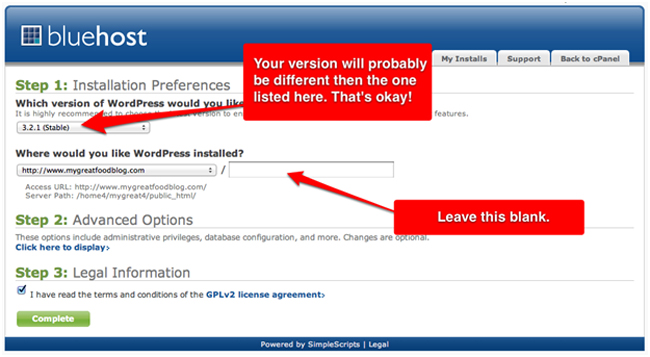
Here is what your installation preferences should look like:

Click complete. If you get the warning below click “Overwrite Existing Files.”

Once you get the “Installation Complete” you’ll want to write down your Login URL, Username, and Password to avoid lost password annoyance and frustration at yourself later. You can change these to something easier and memorable later, but you’ll need them for your first time logging in.

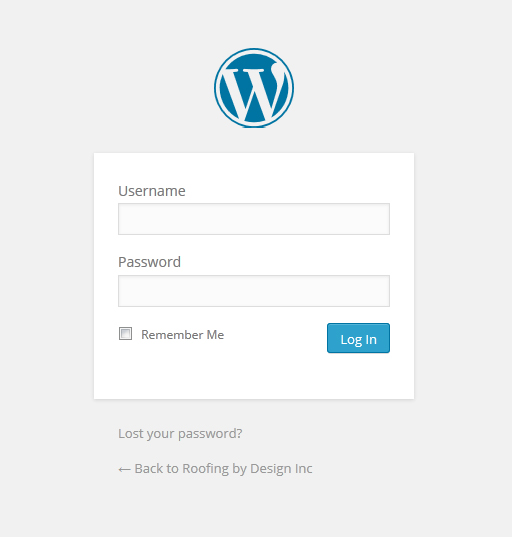
Type your Login URL into your web browser. You’ll see a login screen like the one below. Enter your Username and Password you copied down from the previous step.

3) Making Your Blog Look Sharp!
At this point, you officially have your own roofing blog! Yesss! How does it feel? Welcome to the world of blogging, my compadre!
You’re minutes away from sharing your latest roofing project or employee of the month with not only your contractors or homeowner, but around the world!
Before you jump onto your next roofing project there are a few things you can do to make your blog look professional.
It’s time to pick your theme!
WordPress has tons of free WordPress themes to pick from. You can take a look through the options here. But, if you’re looking for a premium theme, check out these options:
- The Thesis Theme from DIY – This was the first theme that we used with Roofing by Design. We loved the simplicity and still highly recommend it.
- The Genesis Framework – This is the current framework our blog is built on with Roofing by Design. You’ll also want to look into the available Studiopress Themes, like the Balance Theme.
- Solostream – They have some really great looking Business themes that are easy to use and have different options. It’s also a bit cheaper than the other premium themes listed here. It’s defiantly worth a look.
Enjoy!
Now that you have a fantastic blog start writing!
We want to hear about your roofing adventures, the do’s and dont’s, and even show us a little fun with your employee.
The next step is SEO (Search Engine Optimization). Don’t let that acronym scare you and don’t spend $1,000’s of dollars hiring someone. If you need help with SEO, feel free to contact me Here.
I am taking reservations for Roofing SEO with clients with one restriction – ONLY five roofing companies from each state within a 100 mile radius from each other.
Contact me to discuss!


